

Sensitivity: Adjust the sensitivity level in "VOX Setting."

Download and view the product manual for detailed instructions on setting up your bonoch Baby Monitor Pro.
How to set up the VOX Mode?


Sensitivity: Adjust the sensitivity level in "VOX Setting."

What is Sleep Mode?


How to set up the Crying Alarm?


How to set up the Motion Alarm?


Are there any privacy concerns?
What is the max connection distance?
Trouble connecting or maintaining connection between the monitor and camera
1. Power Supply Check:
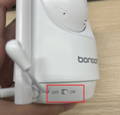
Ensure the power adapter is properly connected. Check if the camera is plugged in—the indicator light should be green when powered. Slide the switch to "ON."
2. Reset the Device
Method 1:
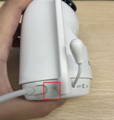
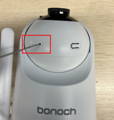
1) Use a paperclip to press the "Reset" button on the camera (location shown below).
2) Use a paperclip to press the "Reset" button on the monitor (location shown below).
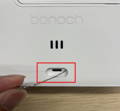
Method 2:
Through the menu settings interface "System Setting," select "Reset" to reset.


3. Delete the Device
Delete the connected device in the camera settings.


4. Reconnect the Device
1) Long-press the camera's "Pair" button until you hear a voice prompt, then release.

2) In the camera settings, select "Add Camera," enter the scanning page, and wait for the device to connect automatically.

3.3 Unbind and then reconnect your baby monitor.
3.3.1 To unbind cameras, go to System Setting > Camera, select the camera you want to unbind, then long press "OK" to complete the unbinding process.

3.3.2 To reconnect the camera, go to System Setting > Camera, select the code you want to allocate to your camera, and then follow the on-screen instructions to complete the connecting process.

Signal Transmission Issues
1. Blurry or Delayed Video
1) Place the monitor closer to the transmitter to reduce delay, ensuring it is within the effective range.
2) Slight delays may occur during device movement—use the device while stationary.
3) Remove obstructions around the device (e.g., metal crib rails).
2. Device Signal Interruption
1) Restart the monitor and check if the camera and monitor are properly powered.
2) Ensure the monitor’s antenna is extended.
Sound Issues
1. Loud Howling Noise
1) Howling may occur if the monitor and camera are too close. Separate them or lower the volume to below 2 bars (8-bar maximum).
2. Delay in Intercom Function
1) When using the intercom, press and hold the button for 1 second before speaking.
3. Intermittent Sound
1) Ensure the camera’s microphone is not blocked.
2) Position the camera’s microphone toward the baby/adult, keeping the distance short.
4. No Sound in Split-Screen Mode
1) Sound is transmitted in split-screen mode. The green frame in the monitor’s display indicates which camera’s audio is active.

2) Adjust the audio volume in the corresponding camera settings.


Limited signal transmission range
1. To achieve a better quality of signal reception, it is recommended to adjust the antenna on the monitor.
2. It is important to note that low battery levels can have an adverse effect on signal reception. Therefore, it is recommended to charge the monitor in a timely manner.
3. the presence of metallic objects within your household environment can potentially lead to signal interference. Therefore, it is recommended to remove such objects to optimize signal reception.
Display Issues
1. Intermittent Black Screen
In VOX mode, the camera may enter a sleep-like state and turn off after prolonged silence. It will activate automatically when sound is detected (sensitivity can be adjusted by increasing the VOX level).
2. Pixelated/Flickering/Black Screen/Freezing Video
1) Reset the monitor and camera. The reset hole for the camera is located under the lens, and for the monitor, it's near the charging port.
2) Ensure the camera’s night vision is set to "Auto".
Monitor not responding
1. When the screen is off, a quick press of any key on the monitor will activate the device.
2. In the case of low battery, charge the monitor for 10 minutes using the charging cable. Afterward, perform a long press of the power button to turn it on.
3. Utilize a pin to press the reset button on the monitor to perform a reset.

Monitor unable to charge
1. Examine the charging port of the monitor for any foreign objects.
2. Inspect the charging indicator light on the monitor to determine if it is illuminated in a blue hue, indicating proper charging.

3. Reset the monitor for a few seconds.

3. Confirm whether the power socket is operational by attempting to charge other electronic devices. Check for normal functionality.
4. For further investigation, try using the camera charger and charging cable. Alternatively, you can experiment with other available USB-C cables within your household to ascertain their compatibility and functionality for charging purposes.
Inaccurate temperature readings on your display
Ensure the environment is within the device’s operating range and keep the camera away from temperature interference sources (e.g., refrigerators, ovens)
Problems setting up scan mode with multiple cameras
1. To cycle through different views, utilize the Left and Right buttons. Once you've chosen your desired view, simply press the "OK" button to transition into single-screen mode.


2. For activating scan mode, perform a long press of the "OK" button lasting 3 seconds. To confirm the successful activation of scan mode, search for the "cycle" icon within the status bar.

3. When seeking to exit the scan mode, execute a long press of the "OK" button for a duration of 3 seconds. If the "cycle" icon disappears, this indicates a successful exit from the scan mode.
Other issues
For assistance in resolving your issue, please reach out to our dedicated customer service team at support@bonoch.com.
